15 Beginner’s Yoga Poses That Will Transform Your Body
15 Beginner’s Yoga Poses That Will Transform Your Body
Do you wish to have a healthier, stronger, and more vibrant body? If so, these 15 Beginner’s Yoga Poses may be just what you are looking for.
When practiced regularly, they will transform your body in less than 20 minutes a day.
If you are new to yoga, yoga is an ancient Indian practice designed to enhance balance and harmony in body, mind, and soul. It combines physical movement (Asanas), meditation, and breath work (Pranayama) with ethical and moral principles and guidelines.
There is no previous experience in Yoga needed to do these poses. All you need is comfortable and loose fitting clothes and a small free space on the floor.
A soft mat or a carpet is also helpful.
Always consult with your physician before doing these Beginner’s Yoga Poses
Before you start doing these 15 beginner’s yoga poses, always consult with your physician.
While holistic and profoundly health promoting, if you are suffering from certain injuries or health conditions, even some of these beginner yoga poses may cause further harm.
We need to listen to our bodies while doing these beginner’s yoga poses
Before we begin, please be aware that Yoga is not a fast track to a transformed body, mind, and soul.
Regardless of whether we are beginners or advanced yoga practitioners, we are always wise to pay close attention to the body.
Pain or strain is a signal that something is off.
Thus if we are doing a pose and become aware of pain, that is a signal to us to either stop doing the pose or modify it to suit our bodies’ unique configuration and physiology.
And so if you do any of these poses and experience pain, that is your body letting you know that you need to stop what you are doing.
Or that you need to do it in a different way.
Be mindful of your breathing while doing the poses
Breathing is a fundamental part of Yoga. As we are in our poses (Asanas) we want to be very mindful of our breathing and take deep and slow breaths.
Doing these 15 beginner’s yoga poses takes less than 20 minutes.
Seek to hold each pose for about 30 seconds. To do this you can either set a timer, or hold the pose for 10-15 deep and slow breaths.
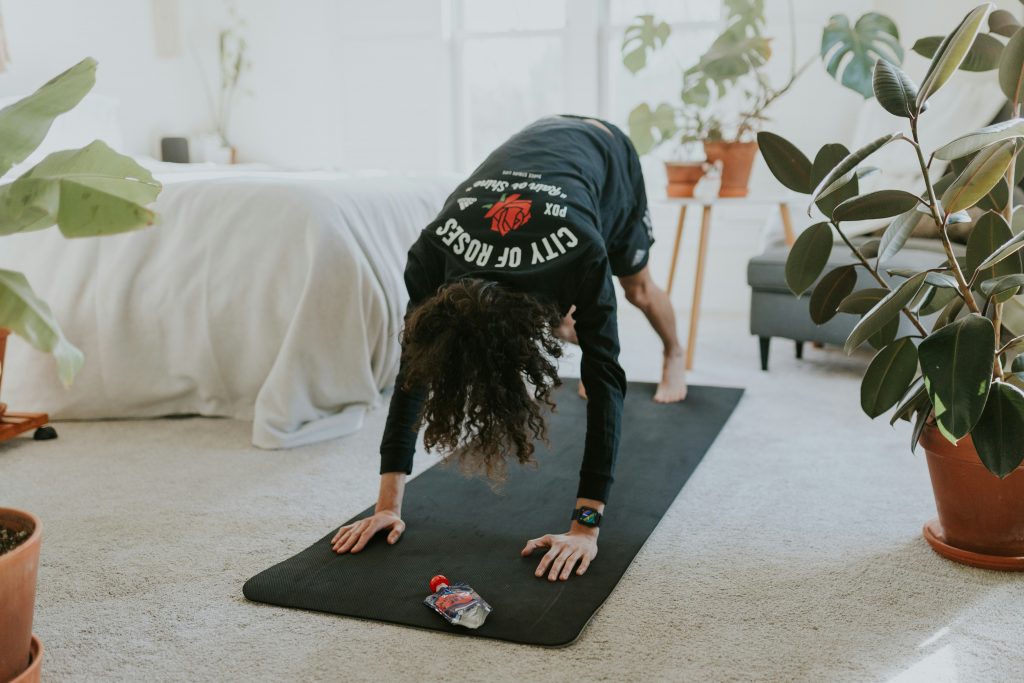
1. Downward Facing Dog Pose – Adho Mukha Svanasana
The first of our beginner’s yoga poses that we will explore is called the Downward Facing Dog Pose. The Downward Facing Dog works, stretches, and strengthens the entire body.
Begin on all fours:
Start by getting down on all fours on the floor or mat with your wrists directly underneath your shoulders and your knees under your hips.
Tuck your toes:
Tuck your toes under with your palms pressed to the floor.
Now, slowly begin to straighten your legs to bring your hips up toward the ceiling and extend your spine.
Depending on your flexibility, you can keep your heels on the floor and hold the pose with your legs bent or straight.
Balance your weight:
As you hold this pose, make sure that you are evenly balanced between your hands and feet.
Hold the Pose:
Hold this pose for the 30 seconds or the 10-15 slow breaths.
Come out of the pose slowly: Slowly bend your knees until you are back on all fours, and let us move on to the next pose.
Benefits of the Downward Facing Dog Pose
The Downward Facing Dog is one of the most versataile yoga poses. It…
Stretches and strengthens pretty much your whole body.
Improves circulation
Calms the mind
Improves digestion
Improves body awareness
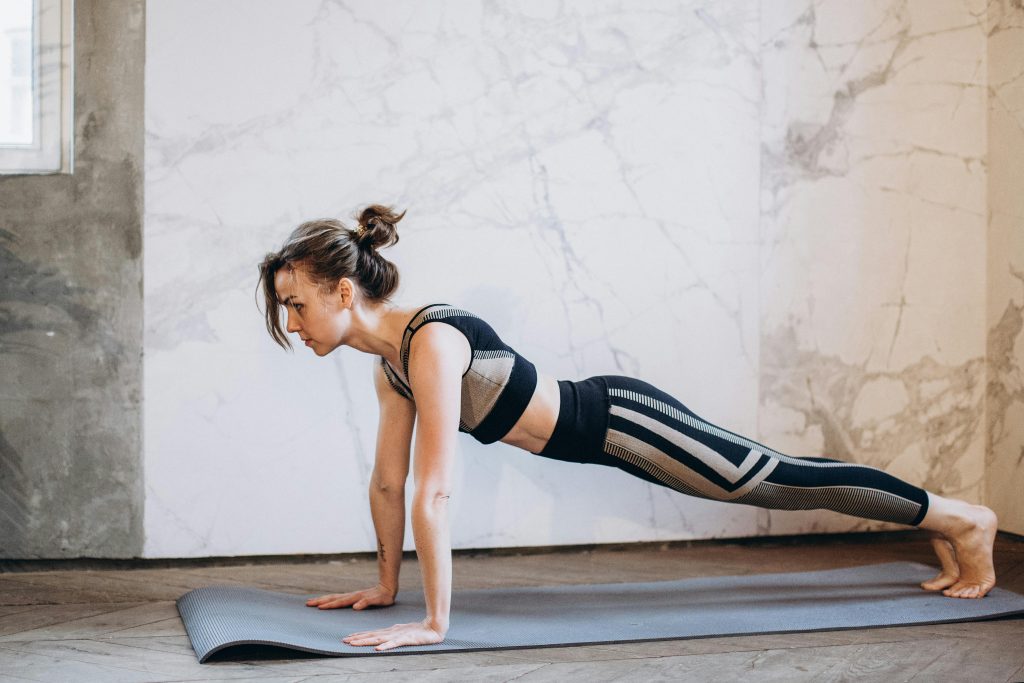
2. The Plank Pose – Phalakasana
The second of these beginner’s yoga poses is called the Plank Pose.
Assume a push-up position:
Start by getting into a push-up position. Get down on all fours on the ground or mat.
Place your hands right below your shoulders and straighten your legs, so that only your hands and feet are touching the floor.
Keep your body in a straight line:
Using your toes, arms, and hands for support, make sure that your body forms a straight line from head to toe.
Hold the Pose:
Hold this pose for 30 seconds or 10-15 slow breaths.
Come out of the pose slowly: Gently lower your knees until you are back on all fours.
Modifications
If standing with your arms straight is too hard, you can modify the plank pose by placing your forearms on the ground and using them for support instead of your hands.
Benefits of the Plank Pose
The benefits of the Plank Pose are many, including:
- Strengthening the core and improving posture
- Improving balance
- Lengthening of the spine
- Improving metabolism
- Enhancing mental focus
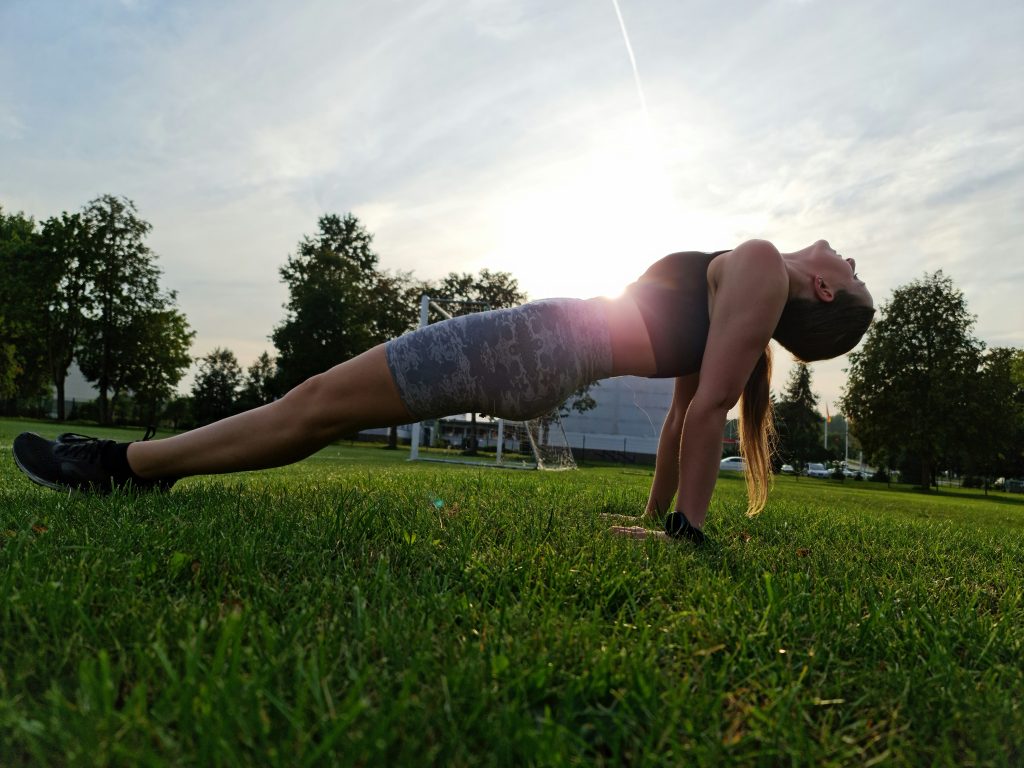
3. Upward Plank Pose – Purvottanasana
Moving on to the third of our beginner’s yoga poses, this one is called the Upward Plank Pose.
Sit up straight
Begin by sitting up straight on the floor or mat with your legs straight in front of you and your hands pressed to the floor behind you.
Lift your hips
Lift your hips with your feet and hands pressed to the floor. Make sure that your legs and buttocks are actively engaged in the pose
Drop the head
If your neck allows it, let your head drop back.
Hold the Pose:
Hold the upward plank pose for 30 seconds or 10-15 slow breaths.
Benefits of the
The Upward Plank Pose stretches the upper body
- Strengthens the core
- Opens the chest
- Stimulates the spine
- Strengthens legs and glutes
- Improves balance
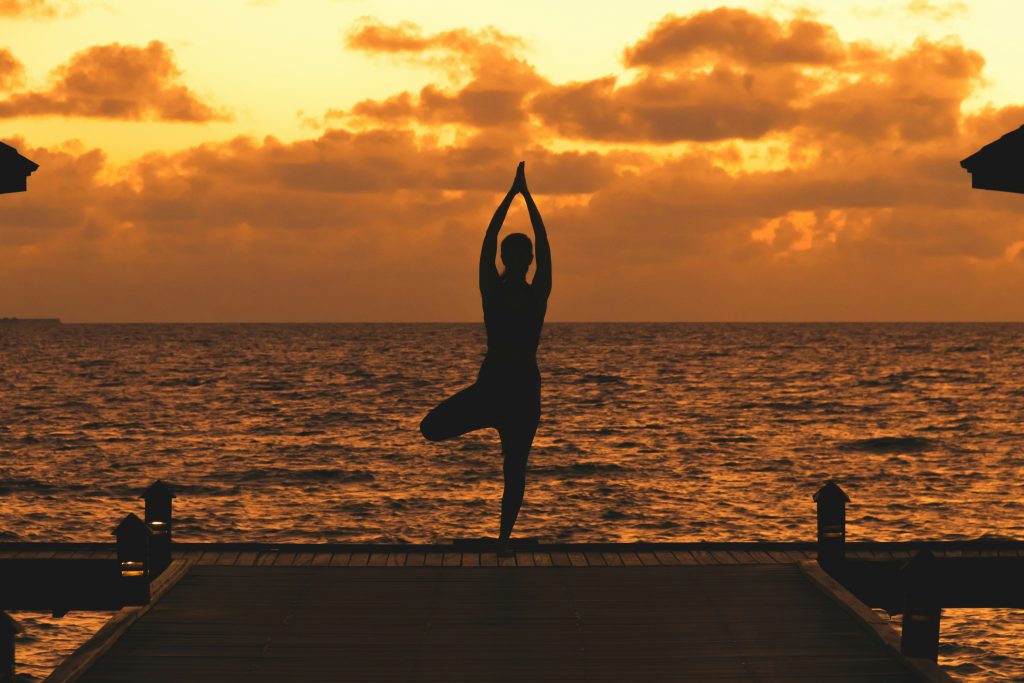
4. The Tree Pose – Vrikshasana
Stand tall
To get into the tree pose, stand tall with your feet together.
Slowly raise your left knee, grab hold of your right foot, and place it as high as possible on the inner thigh of your left leg.
Find your balance
Standing with your right foot pressed against your left knee, take a moment to consciously find balance through your left leg and foot.
Press your right foot against your left thigh and your left thigh against your right foot to find stability.
Raise your hands
Slowly raise your arms above your head.
You can either have your hands pressed together in a prayer mudra. Or you can slightly spread your arms with your palms facing each other.
Hold and switch:
Hold the pose for 30 seconds or 10-15 slow breaths, and then switch to the other foot, going through each step once again.
Benefits of the Tree Pose
The benefits of the Tree Pose includes:
- Improved Balance and Posture
- Enhanced focus
- Stronger core
- Improved circulation
- Cultivates calm
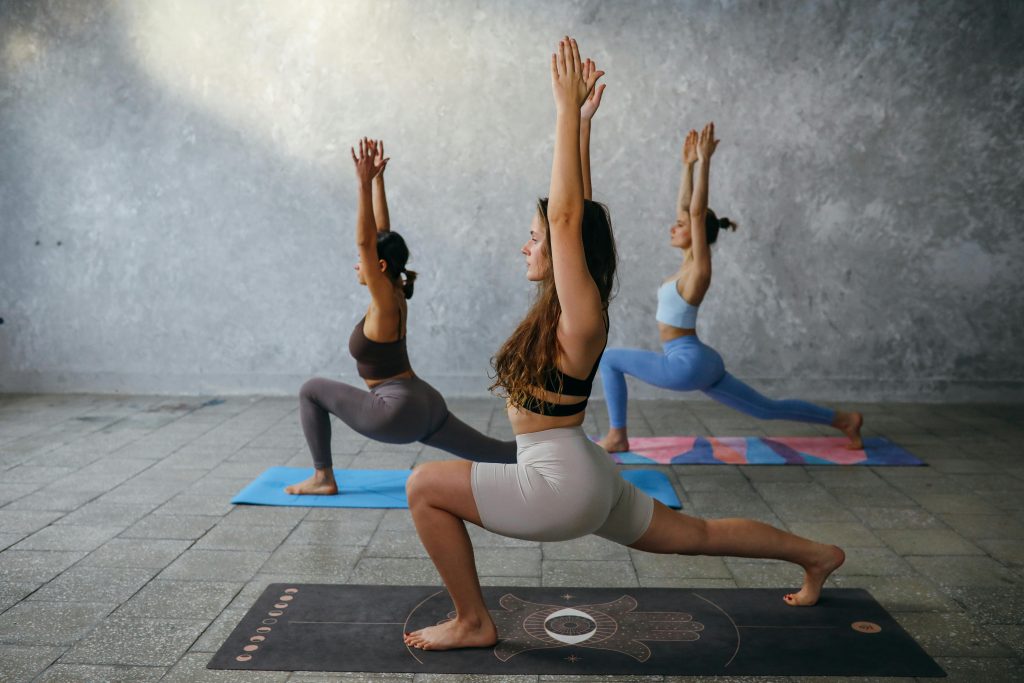
5. Warrior One – Virabhadrasana
Take a wide step
Enter into Warrior One by taking a wide step with your right foot in front and your left foot behind. Slightly open the hips and point the back foot at a 45 degree angle.
Keep your feet about shoulder-width apart, and then rotate your hip so that it is facing forward.
Bend the front knee
Bend your right knee so that your chinbone forms a straight vertical line.
Raise your arms
Now, pull your shoulders back and raise your arms toward the ceiling. palms either pressed against each other or slightly apart.
Hold and switch:
Hold the pose for 30 seconds or 10-15 slow breaths, exit the pose, and switch to the left leg in front for the 30 seconds or 10-15 slow breaths.
Benefits of the Warrior One Pose
The benefits of the Warrior One Pose includes:
- Improved circulation
- Enhanced balance and stability
- Opening of hips and chest
- Improved core strength
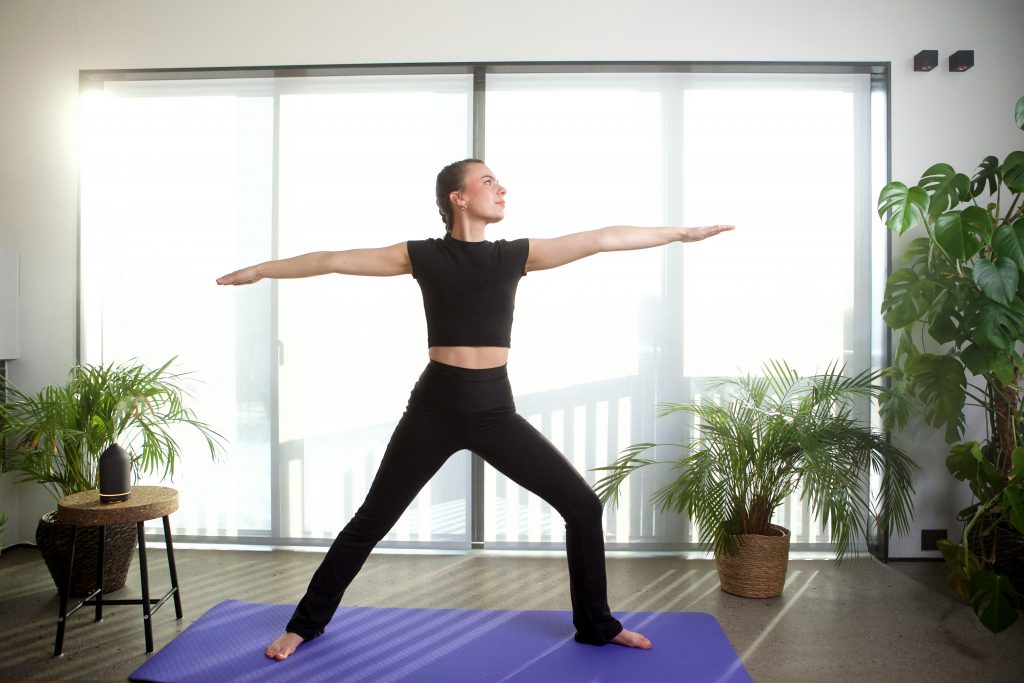
6. Warrior Two – Virabhadrasana II
Take a wide step
Enter into Warrior Two by taking a wide step with your right foot in front and your left foot behind. Open your hips and point the back foot at a 90-degree angle.
Keep your feet about shoulder-width apart, and then rotate your hip so that it is facing forward.
Bend the front knee
Bend your right knee so that your chinbone forms a straight vertical line with your knee directly above your ankle.
Extend your arms
Keeping your back straight, extend your arms out horizontally. Relax the shoulder and press out through your fingers.
Look over your hand
Holding this position, turn your head and look over the middle finger of your front arm.
Hold and switch:
Hold the pose for 30 seconds or 10-15 slow breaths, slowly exit the pose, and switch to the left leg in front for the 30 seconds or 10-15 slow breaths.
Benefits of the Warrior Two Pose
The Warrior Two Pose has numerous benefits, including:
- Stretching and strengthening the core and the whole lower body
- Improving balance and stability
- Opening the hips and chest
- Improved posture
- Stimulating circulation
- Enhanced emotional balance
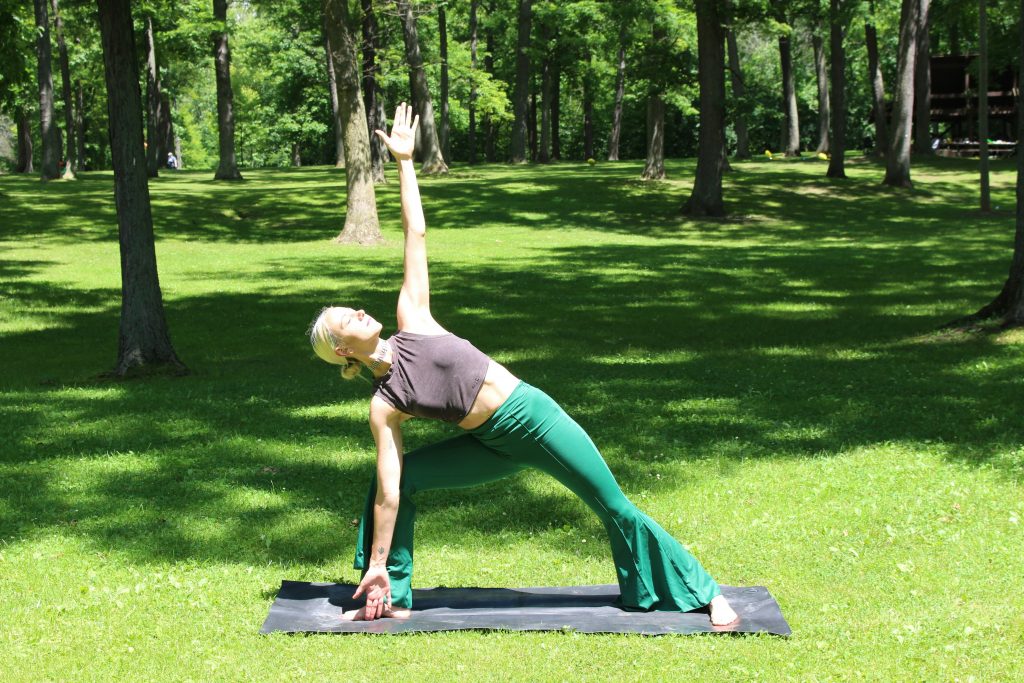
7. The Extended Side Angle – Utthita Parsvakonasana
The next of our beginner’s yoga poses is called the Extended Side Angle Pose.
Take a wide step
Enter into the Extended Side Angle by getting into the Warrior Two Pose.
Take a wide step with your right foot in front and your left foot behind.
Open your hips and point the back foot at a 90-degree angle.
Keep your feet about shoulder-width apart, and then rotate your hip so that it is facing forward.
Bend the front knee
Bend your right knee so that your chinbone forms a straight vertical line with your knee directly above your ankle.
Extend your arms
Instead of keeping your back straight and extending your arms horizontally, lean forward and place your right hand palm down, next to your right foot.
Extend your left arm toward the ceiling or sky, keeping a straight line from the right hand to the left.
Look over your hand
Holding this position, turn your head and look up toward our left hand.
Hold and switch:
Hold the pose for 30 seconds or 10-15 slow breaths, slowly exit the pose, and switch to the left leg in front for the 30 seconds or 10-15 slow breaths.
Benefits of the Extended Side Angle Pose
The Extended Side Angle:
- Stretches hips and groin
- Strengthens the legs, core, hamstrings, calves, shoulders, and spine
- Opens the chest and shoulders
- Improves balance and coordination
- Stimulates digestion
- Improves body awareness and focus
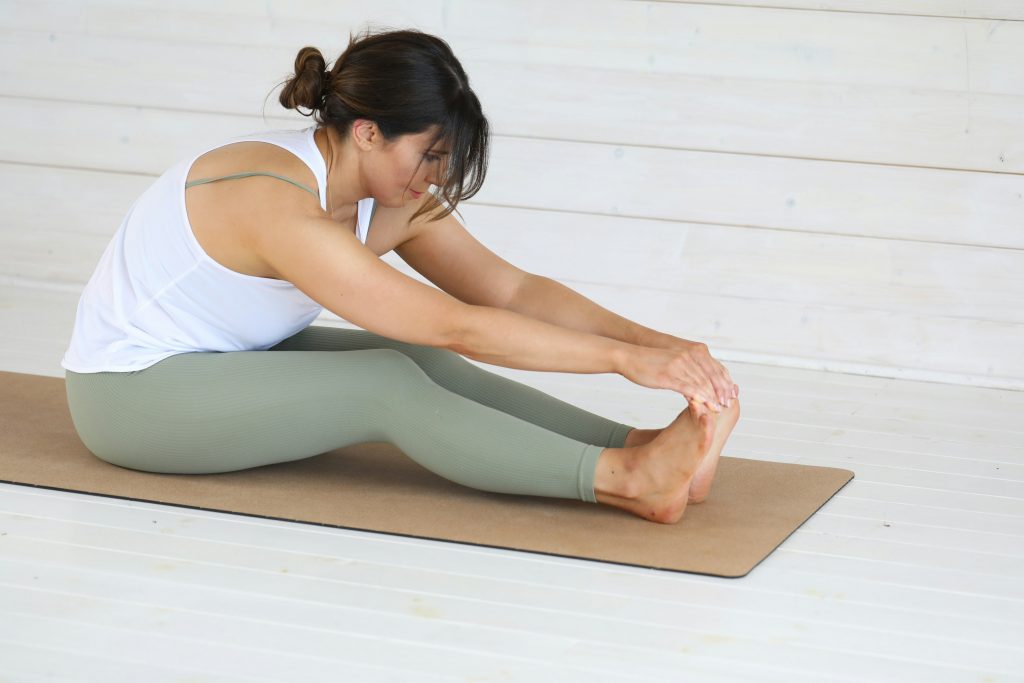
8. Seated Forward Bend Pose – Paschimottanasana
Sit on the floor or mat
Sit on the mat with your back straight and your legs pulled together, straight out in front of you. Make sure that your toes are pointing toward the ceiling all through the pose.
Lean forward
Keeping your back straight through the entire pose, exhale and start to lean forward from your hips and, if possible, grab hold of your toes or feet with your hands.
Hold the pose:
When you have come as far down as you can, hold the pose for 30 seconds or 10-15 slow breaths.
To make holding this pose a little easier, be mindful of your breath, taking nice long and slow breaths.
Slowly exit the pose by sitting up again.
Modification
If keeping your legs straight while leaning forward is too difficult for you, you can bend your knees as much as needed to be able to grab hold of your feet with your hands while keeping your back straight.
Benefits of the Seated Forward Bend Pose
The Seated Forward Bend Pose helps:
- Stretch the spine, hamstring and lower back
- Relieve tension and calms the mind
- Balance energy
- Stimulate the nervous system
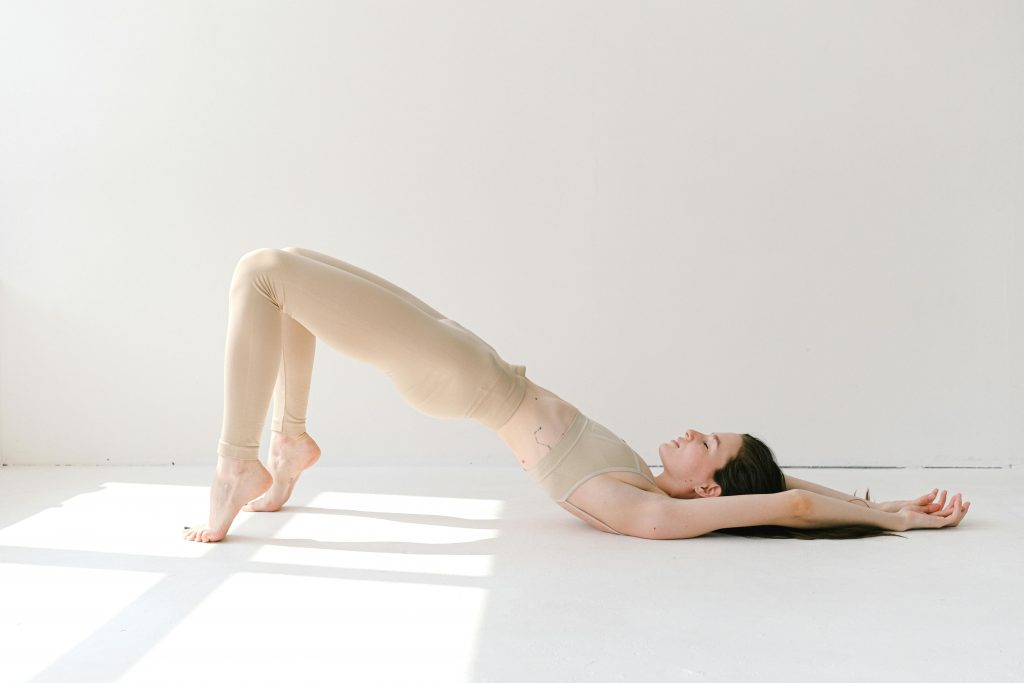
9. The Bridge Pose – Setu Bandhasana
Number 9 in our series of beginner’s yoga poses is the Bridge Pose.
Back flat on the floor
Lie down flat on your back.
Bend your knees
Keeping your knees about hip-width apart, bend your knees and place your feet right underneath your knees.
Rest your arms on the mat, palms facing down.
Raise your hips
Find balance and stability coming from your feet and your shoulders, and take a deep breath in.
As you exhale, slowly raise your hips toward the ceiling.
Without adding pressure to the head or neck, go as high up with your hips as feels comfortable for you.
Hold the pose
Hold the bridge pose for 30 seconds or 10-15 slow breaths, and engage your buttocks
Benefits of the Bridge Pose
The Bridge Pose:
- Stretches both the front and the back of the body
- Opens the chest and shoulders
- Improves core strength
- Enhances blood circulation and digestion
- Reduces Stress and Anxiety

10. Child’s Pose – Balasana
Number 10 of our beginner’s yoga poses is called the Child’s Pose.
Sit on your knees
Start the child’s pose by sitting on your knees on the mat.
Lean forward
Keeping your knees together or slightly apart, exhale and lean forward to place your forehead on the floor in front of you.
Keep your hands either resting beside you, palms up, or stretched out in front of you, palms down.
Hold the pose
Hold the Child’s pose for 30 seconds or 10-15 slow breaths, while being mindful of your breathing
Benefits of the Child’s Pose
Child’s Pose:
- Stretches your lower back, hips, thighs, and ankles
- Relaxes your spine, shoudler, and neck.
- Promotes relaxation and relieves tension
- Encourages deep breathing
- Improves circulation and digestion
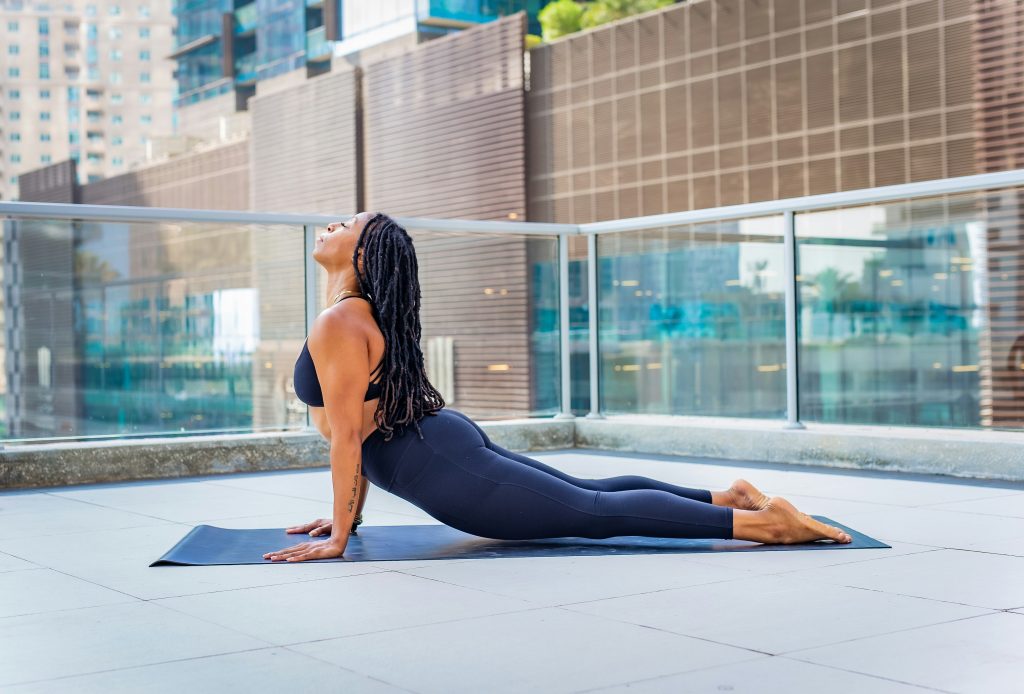
11. Cobra Pose – Bhujangasana
Lie flat on your belly
Lie belly down on your mat. Keep your legs together and stretch your toes out.
Place your hands, palms down, by your chest.
Gently raise your upper body
Keep your toes and hips pressed to the floor, and relax your shoulders back to maintain space between your shoulders and head.
Gently lift your upper body toward the ceiling, and hold the pose for 30 seconds or 10-15 slow breaths.
Hold the pose
Hold the Cobra pose for 30 seconds or 10-15 slow breaths, while being mindful of your breathing
Benefits of the Cobra Pose
The benefits of the Cobra Pose include:
- Strengthening of the spine
- Improved posture
- Stretching of the chest and shoulders
- Opening of the heart
- Mental clarity and reduced stress and fatigue
Stay away from this pose if you have any back injuries.
12. Bow Pose – Dhanurasana
Next up of our 15 beginner’s yoga poses is the Bow pose.
Lie flat on your belly
Lie down on your belly.
Grab hold of your ankles
Exhale, bend your knees, and lift your thighs up off the floor.
Reach back with your hands and grab hold of your ankles.
Lift your body up
Holding your ankles, begin to slowly lift your legs and upper body up into a bow-shaped posture.
Go as high as possible, balancing the weight of your body on the lower abdomen.
Keep your head up, look straight ahead, and breathe normally
Hold the pose
Hold the Bow Pose for 30 seconds or 10-15 slow breaths
Benefits of the bow pose
The Bow Pose:
- Strengthens and stretches the back and abdominal muscles
- Improves digestion
- Opens the chest
- Enhances posture and improves balance
Stay away from this pose if you have frequent migraines or insomnia and if you are diagnosed with high or low blood pressure.
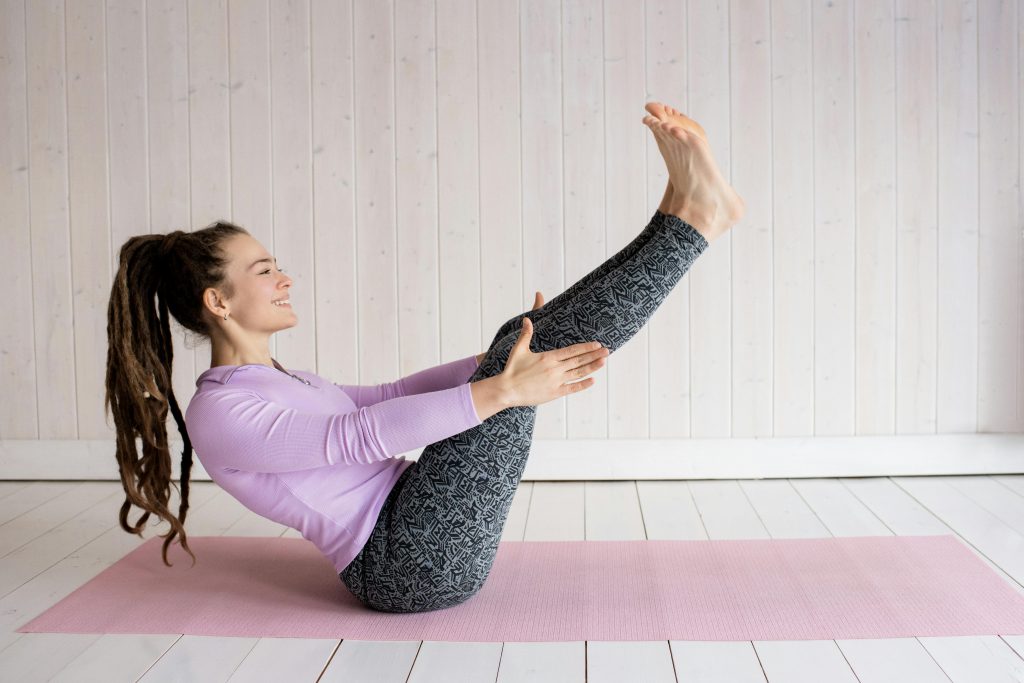
13. Boat Pose – Navasana
Sit on the ground
Start the Boat Pose by sitting up straight on the mat or the ground.
Place your hands on the mat behind you, bend your knees, and, while keeping your posture straight, lean back.
The farther back you lean, the more challenging the pose will be.
Lift your legs
Balancing on your sitbones and with your knees still bent, begin lifting your legs until your shinbones are parallel to the floor.
Hold the pose
Hold the Boat Pose for 30 seconds or 10-15 slow breaths.
Modifications
If you want an extra challenge, you can begin by extending your arms forward.
and if you want to add even more challenge, you can also extend your legs, stretching the toes forward to form your body into a V-shape.
Lift your chest and look up.
Benefits of the
The Boat Pose:
- Strengthens the core
- Improves balance and coordination
- Reduces stress
- Enhances digestion,
- Stimulates the thyroid, kidneys, and intestines
Stay away from this pose during menstruation
14. Fish Pose – Matsyasana
Lie flat on your back
Begin the Fish Pose by lying flat on your back on the mat or the ground. Keep your back straight and your knees slightly bent.
Lift your hips slightly
Slightly lift your hips while sliding your hands underneath your butt with your palms facing donwnward.
Allow the butt to rest firmly on your hands.
Keep your forearms and elbows close to the body.
Lift your upper body
Supported by your hands and elbows, inhale and by pressing your forearms down, gently lift your upper body and let your lower your head to the floor, or let it rest fully on the floor
Hold the pose
Hold the Fish Pose for 30 seconds or 10-15 slow breaths.
Benefits of the Fish Pose:
Some of the benefits of the Fish Pose include:
- Strengthening of the hamstrings and lower back.
- Stimulation of the thyroid gland
- Reduced stress and anxiety
- Opening of hips and ribcage
Stay away from this pose if you have migraines or insomnia.
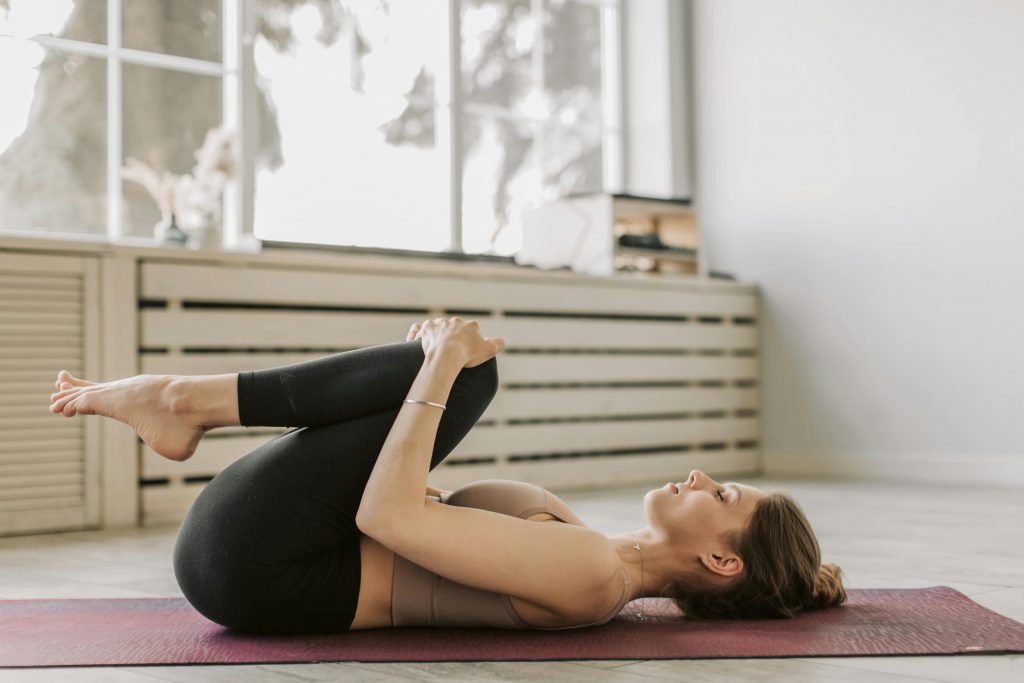
15. Wind-Relieving Pose – Pavanamuktasana
The very last of our 15 beginner’s yoga poses is called the Wind-Relieving Pose.
Lie on your back
Begin the Wind Relieving Pose by lying flat on your back.
Lift your knees up
Still on your back, exhale, lift your knees up toward your chest, and hug them with your arms.
Squeeze
Press on your lower abdoment by squeesing and pressing your knees down with your arms.
Lift your head
Still squeesing, gently lift your head, neck, and chest and bring them close to, or even in between, your knees.
Hold the pose
Still squeezing the Wind Relieving Pose for 30 seconds or 10-15 slow breaths.
Benefits of the Wind-Relieving Pose
The Wind-Reliving Pose:
Helps improve digestion and release toxic gas from the body (hence the name)
Stretches the lower back and strengthens the spine.
Helps massage reproductive organs and pelvic muscles
Improves circulation
Alleviates menstural discomfort and lower back pain.
Some Useful tips before doing these 15 beginner’s yoga poses
- Start Slow: Begin with basic poses and gradually progress to more complex ones as you build strength and flexibility. Attend beginner classes or follow introductory videos.
- Listen to Your Body: Pay attention to how your body feels during practice. Don’t push yourself into discomfort or pain; modify poses if necessary and respect your limits.
- Focus on Breath: Breathing is a fundamental aspect of yoga. Practice deep, mindful breathing (pranayama) to enhance relaxation and connect your movements with your breath.
- Practice Regularly: Aim for consistency rather than intensity. A few short sessions each week can be more beneficial than infrequent, longer practices.
- Dress Comfortably: Wear comfortable clothing that allows for a full range of motion. Consider breathable fabrics that wick moisture away during practice.
- Be Patient: Yoga is a journey. Progress may take time, so be patient with yourself and celebrate small achievements along the way.
- Join a Yoga community – either in person or online